Wednesday, August 29, 2007

Brocade Deer

What a week it has been here in New York. We are in our final day today of the event and it's been fabulous and tiring at the same time.

Here is the only card I have managed to make so far (boohoo). I call it my Brocade Deer.

I used Chocolate Chip cardstock, Brocade Designer Series Paper, Very Vanilla, Chocolate Chip Classic Ink and ribbon. Of course, th Crop-of-love-A-Dile and brass eyelets.

Friday, August 24, 2007

Leaving on a jet plane....

This week I can say without a doubt has been the busiest week I have had in a VERY long time.
Apart from my card class this week, I have had zero time to create anything as I have been working 16-18 hour days for final preparations for an event we are having in New York next week.

I leave tonight on the red eye to New York!

All card swaps and long distance card class packets have been posted also!

I am pleased to say, my favorite stamps, paper and inks are packed away in their very own suitcase for the ride to New York with me, so I will definitely be posting during the coming week.

have a great weekend everyone!

Tuesday, August 21, 2007

Inner Circle Card Swap - August

I host a monthly card swap called the Inner Circle Card Swap. These are the creations of the card making divas for the regular card swap.

Judy


Holly


Susan


Lisa


Gail


Mary


Shirley


Marie


This month's challenge was the Diorama Card. There were 4 ladies who participated but I had sealed the bags before I took the photos and forgot to take a photo of Lisa's card! d'oh!


Susan


Shirley


Judy


If you are interested in joining my monthly card swap club, drop me a line at marie@stamplounge.com

Monday, August 20, 2007

Happy Boo - Sketch This Challenge

This is my take on this weeks Sketch This challenge.


I used Stampin' Up! Autumn Apparitions and Booglie Eyes stamp sets. Only Orange and Black Cardstock, Creepy Crawly Double Sided Designer Series Paper, Black Ink, Only Orange and Green Galore Markers.

Saturday, August 18, 2007

Beate's Sketch Challenge #15

This is my take on Beate's weekly sketch challenge.

I love the simplicity of the Merry and Bright stamp set.

I used Old Olive, Wild Wasabi and Real read cardstock, Cutie Pie double sided designer paper, Black, Old Olive, Ruby Red, Creamy Caramel and Basic Brown classic ink pads and an Aqua Blender as well as Wild Wasabi double stitched ribbon.

I would usually shade the base of the image to give it dimension but I like the 2D look of the image without shading. :-D


Friday, August 17, 2007

Simply Scrappin' - Set Four

My 4th piece of cardstock from the Simply Scrappin' Kit was Creamy Caramel. As much as I like the color, I hardly ever use it. I kept looking and looking at it and couldn't decide what to do with it. I cut it into 4 6x6 pieces so as least I made my first commitment to it.

I had decided I didn't have time to do a scrap page or make cards today, so I needed something that fit my "FFF" motto - Fast, Fun and Fabulous.

Well, fast and fun I got, Fabulous is always in the eye of the beholder. In my case, these aren't too far from it :-D

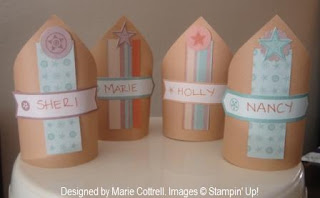
These are a great kids (or adult) party decorations. The mini "crowns" can be used as fun table seating placements or napkin ring holders and of course the party favor boxes for your departing guests!


For the mini crowns, I cut a 6x6 piece in half diagonally so I had 2 triangles. curl the ends of the longest straight edge and staple the two back points together and embellish the front side with paper and adhesive die cuts that come with the kit and whallah!

For this cute little box, start with your piece of 6x6. One one edge score at 1 inch and 5 inches. on the other edge(not the opposite edge) score at 2.5 inches and 3.5 inches. Cut the 2 center lines to the 1 inch line on each side. Fold at the score lines and tape the box together.

I love this cone. Take your 6x6 piece of cardstock and break down the fibers of the paper by running the paper along the edge of your table so you curl it a little. Keep running it over the edge of the table until you feel like you can manipulate the paper enough into a cone shape.

Bring two edges together to make a cone shape. Decorate the inside of your cone. I used 2 6x1.5 inch pieces of cardstock taped along the top edges of the cone (which you cant see in this photo). I then adhered the t edged together with sticky strip and embellished the front using the adhesive die cuts from the kit.

Stamp-A-Rama Cards

These are the remaining Show Box swap cards we made at Stamp-A-Rama.


Elyse Foley's card


Mindy Owen's card


Carol Smith's card


Karen Felix's card

Thursday, August 16, 2007

Simply Scrappin' - Set Three

For today, I used again, 1 piece of cardstock and 1/2 a sheet (actually I think it was less than half) of double sided designer series paper from my Round Up Simply Scrappin' Kit.

I made 2 6x6 scrap pages. 2 3x3 cards and 1 3x6 card. Again, no stamps and no other embellishments except for the adhesive die cuts that come in the kit.

In this case, the 3x3 cards, I will stamp them with a greeting and in the case of of the one with the round scallops on it, a little stamped flower or other image, in the center to dress it up a little before I send them out.


Stamp-A-Rama Project - Box


Karolee Smiley's project at Stamp-a-Rama was this very cute gift box.

We had various color options to choose from. Since I love tone on tone, I selected the Mellow Moss and the great thing was Karolee had cut out and scored it for us already! yippee :-D

Wednesday, August 15, 2007

Simply Scrappin' - Set Two

Here is what I created with my second piece of cardstock and the other half of the double sided Designer Series Paper. I am having so much fun with this little personal challenge! More tomorrow :D


Altered Accents and Elements Tin


At Stamp-A-Rama, we jazzed up an empty Accents and Elements tin. This is a great tin to give little 3x3 cards as a gift or an accordion mini scrapbook, or, or, or...the options are endless :)

We created a belly band using; Double Sided Designer Series Paper, Crop-of-love-A-Dile to punch a hole through the tin to feed through the ribbon to hang the altered chipboard flower as well as for the jumbo eyelet on the "E"njoy tag.

This was a super fun and fast way to create a cute gift package.

Tuesday, August 14, 2007

Stamp-A-Rama Clipboard

This is the clipboard I made at Patty Bennett's Stamp-A-Rama session on Saturday.

I love the charcoal tone on tone paper of the Uptown Double Sided Designer Series Paper. We also used the adhesive die cuts from the Build a Flower Accents and Elements tin.

The flower on the clip itself is actually a magnet.

Love Love!

Look Ma...no stamps!

I love the Stampin' Up! Simply Scrappin' kits. You get 8 sheets of 12x12 textured cardstock, 6 sheets of exclusive Double Sided Designer Paper that you can't get anywhere else and 6 sheets of adhesive die cuts. My favorite right now is "Round Up".

Last night I challenged myself to use
only one sheet of cardstock and half a sheet of the double sided designer paper with the adhesives only - no stamps, no embellishments JUST the scrappin' Kit! Hooooweeee....I nearly made it! I did pull out my crafters Kit and used the paper piercing tools on one 3x3 card but that's it! yes!!

With the one piece of textured cardstock, I made one 6x6 scrap page, two 3x6 and two 3x3 cards.

So of course, I will continue to challenge myself with this kit and I will post the projects daily.


Monday, August 13, 2007

Scaredy Cat....

I have been wanting to play with my new Halloween papers and stamp sets for a couple of days now but haven't had the chance until early this morning.

I really like the way this card turned out.

For this card, I used; Black, Pumpkin Pie and Whisper White cardstock, Creepy Crawly Designer Series Paper, Autumn Apparitions Stamp set, Black Classic Ink, Slit punch and my Crop-of-love-A-Dile to set my Pumpkin Pie and Only Orange Eyelets.


Sunday, August 12, 2007

Sandi's Trophy Card and Beate's Sketch Challenge...

Sandi Lotter's shoebox swap that we made yesterday was this super adorable Trophy card (guess what September's Challenge is going to be for my Inner Circle Card Swap team?).

I absolutely loved it and still had it in my head this morning when i was looking at Beate's Sketch Challenge. I took inspiration from this card to make my card version of Beate's Sketch Challenge.


This is Beate's Sketch Challenge number 14 layout.


And here is my card using the Season of Joy stamp set. Real Red, Always Artichoke and Soft Sky cardstock and classic ink as well as Blue Bayou double Stitch ribbon.

Saturday, August 11, 2007

Stamp-A-Rama fun!


My upline Patty Bennett hosted Stamp-A-Rama today. As it was my first time qualifying to attend (yeah baby!) I was looking forward to it all week. After such an intense work week, a day of creating was that magical dangling carrot I was grasping for and I wasn't disappointed.

We all brought a shoe box swap and spent a couple of hours going around and making each person's card. After lunch, Patty treated us to 5 fabulously fun projects.

I have been trying to work out which of the Fab 5 projects I like the best and it's SO hard to decide! I do think that the single clipboard was the fun one for me as I found some 12x12 paper that I didn't know existed! A totally cool charcoal tone on tone and complimentary 60's circles...guess what just went onto my wish list? Uptown 12x12 Designer Series Paper! I always skipped over this paper as purple, green and yellow's don't really do anything for me but after today, I have definitely changed my mind.

On the way home, I stopped into my new love of a produce store - Perry's Produce at Ardenwood Historic Farm in Fremont (about 30 minutes from home but soooooo worth the trip) and stocked us up for the week on farm grown, organic fruits and vegetables at fantastically reasonable prices. If you are close by, you need to check them out. They are open daily between 9am - 7pm and I think only open between June and November.

I am totally exhausted and think it's going to be an early night. I will post the projects we worked on as well as Sandi Lotter's fabulous trophy card that we made, over the next couple of days, but the photo above shows everything that we made today...whew what a fun day!

Thursday, August 9, 2007

Crop-("of-love")-A-Dile

How many accessories does it take to make a super cute 3x3 card you ask? Well, let's count them!

1) Paper Cutter
2) Scissors
3) Crop-of love-A-Dile for brad embossing and eyelet setting. Have I told you today how much I LOVE that crop-a-dile? lol
4) Eyelets
5) Scallop punch - Mucho love goes to this new punch also...kissy kissy...
Ok, back to earth...
6) 1-3/8 round punch
7) 1-1/4 round punch
8) Ribbon - but of course!
9) Sponge for feathering

9 accessories....It's SOOO worth it don't you think?

Here is a close up of the embossed brads. It so fast and easy to get this effect.
Set your Crop-of-love-A-Dile to settings A and 1. Use the black edge of the C-A-D to evenly space your "embossed brads" or go freestyle like me :)

Here's a word of advise.Practice first so you can work out how hard to press without poking a hole through your paper :D

I found that adhering the designer paper to the cardstock first and them using the Crop-A-Dile works best as the DP is thinner and tears easily.

Oh I nearly forgot! I used River Rock cardstock as the base for the 3x3 card. Apple Cider Double Sided Designer Paper, Blue Bayou double stitch ribbon, Antique Brass Eyelets. Blue Bayou, Soft Sky and Very Vanilla cardstock for the centerpiece. In The Spotlight Hostess set and Sweet Shapes stamp sets. Soft Sky and Mellow Moss Classic Ink for the center center and close to cocoa for the feathered edge.