
Who can believe the holidays have flown by and that we are now sitting in our brand new house checking emails while the movers unpack the trucks....certainly not me.
Reflecting, we have had a very hectic December. As you know I was in New York for a few days for work.
I arrived home on December 12 and worked in the office all day on the 13th. Friday 14th, I jumped in my car and hightailed it to Lincoln to do the final inspection of our new home. Monday 17th and Tuesday 18th were spent closing on the house and receiving the house keys, while Sheri sat her final exams for her Masters degree.
Sheri drove up on Tuesday and we ended up spending the next 4 and a half days painting the house. We headed back to Los Gatos in time for Christmas which was spent amongst packed boxes. After opening our presents and having Christmas breakfast, we finished packing up the house to be ready for the movers who turned up at 8:00AM on the 26th....I'm tired just retelling the story!
Last night we drove up to Lincoln arriving at 10:30pm.
Which brings us to today....the internet, cable and phone has been installed, the alarm folks are turning up momentarily and the guys are busy unpacking the trucks. This is our time of rest until they are done which is when the fun of unpacking begins....
Roll on the new year....we will be ready for a vacation VERY soon!!
Hoping you all had a fabulous Christmas/Hanukkah/Holiday and wishing you a safe ringing in of the New Year.
Now the see how fast I can set up my office and craft room and get crafting again!!!! :-D
Thursday, December 27, 2007
Saturday, December 8, 2007
New York bound...
Greetings from New York!
I always look forward to this time of the year when I travel to New York for work. Being in New York during December is truly amazing! The Christmas decorations, the festive energy of this town, the tourists, the COLD weather! Can you believe that with all the snow storms the east has been hit with lately there isn't a snow flake on the ground?! Chances are it won't snow this week which means this will be the first time in about 6 years I will experience a non-white New York in December! Boohoo!
Although I wont get too much time to go site seeing, I always find the time at night to duck out and head down to Rockefeller Center to see the tree, go visit my all time favorite Christmas store and duck into a couple of other all time favorite locations. This time I will take my camera with me and capture my favorite New York stops and share them with you all :)
Monday, December 3, 2007
11 Days....
I can hardly believe it myself but we are 11 days from closing on the new house! Yaaahooo!!
So far, I have packed up the craft room (whaaaah!), my office, the bathrooms, the wardrobes and linen closets, I have culled the kitchen down to bare necessities and the garage has been culled and packed up also.
Home Depot is my home away from home right now. I have bought the stains and sealers as well as all the paraphernalia that you need to stain the new garage and patio slabs with.
Another trip is required tomorrow as I need more boxes and primer paint for the garage floor as well as gray primer for the dining room which will be painted in a Rich Red (clapping hands!)
All wall paints will be purchased near our new home just in case I need to make extra runs to Home Depot for supplies and just in case we haven't ordered enough (which of course may be a good possibility lol)
We need to do a couple of runs to the Salvation Army as well as the dump to get rid of the surplus stuff we are not taking with us and pack up the rest of the house. All this needs to happen THIS week because of our schedules! Hooley Dooley!
Oh boy...I need to go lay down lol
Saturday, November 24, 2007
Christmas cards
 As promised, here is the Christmas card we made at Kris' workshop last weekend. It is a super cute, simple yet elegant card.
It uses Dashing Double Sided Designer Series Paper, Old Olive and Real Red cardstock and Classic Ink, as well as the Tags On Board stamp set out of the Holiday Mini Catalog.
And here are sneak peeks at our Christmas cards for this year. Obviously I can't show you all of the card as that would ruin the surprise for the receivers! :-D


Thanksgiving....
Has anyone recovered from Thanksgiving yet? Are the left overs gone yet? Not in our household! (yum!)
Thanksgiving for us was spent with friends.
Sheri made her fabulous Cinnamon Rolls (photos below) which are tradition for Thanksgiving and boy, where they GOOD! It is definitely worth hanging out a whole year waiting for these wonderful bites of pure bliss! Wowsers!
Keeley Anne made a pumpkin pie as well as a pecan pie (photos below).
We all had a great time and of course, ate way too much, laughed too much and stayed up WAY too late playing games. Fun times indeed.
Of course, I forgot to take photos of the turkey...I had cinnamon rolls on the brain :-D
Here are a few photos of our Thanksgiving Feast desserts.


Wednesday, November 21, 2007
Sneak Peek - Time Well Spent

Stampin' Up! sent all demonstrators a free stamp set to say thank you. A lovely gesture indeed! The stamp set is a Level 3 hostess set from the Spring/Summer catalog..yippee :)
At Kris's workshop on the weekend, we made two cards, one card featured this stamp set and the other I will post tomorrow which is a Christmas card :)
We used the Le Jardin Double Sided designer paper, Chocolate chip cardstock and ribbon and Marvelous Markers to color in the image.
This set is adorable, and you’ll have the opportunity to earn this Hostess Level 3 stamp set for free if you host a virtual workshop with me in January or February! More details to come on my virtual workshops in January! If this has peaked your interest and you want to learn more, email me at marie@stamplounge.com for some additional "pre-announcement" information. :)
For a sneak peak, here are some other samples (by Stampin' Up!) using the time well spent stamp set...


Friday, November 16, 2007
28 days
 28 days and counting until we close on the house!
By popular demand, here are a couple of photos of the new digs that I took on November 3. We haven't been to see the house since and we won't be until we close on it next month.
This is historically my busiest season at work which means I have limited time at home before we close. I am traveling for work 12 out of the 28 days which means I only have 16 days to pack the house up! (faint). That sounds like a lot but take out the work days and that leaves me with very few hours to get it all done!
Needless to say, by the end of this weekend, the majority of our current digs will be packed up with only the bare necessities out. Now that is a tall ask but when I am on a mission look out! I am like a tornado...you don't want to get in my way LOL

My stamping time has been reduced to near nothing...whaaaaah. I did get a chance to get in there this evening as I needed to prep for a workshop tomorrow, which should be a lot of fun :-)
I hate to admit to the fact, that may very well be the last time I get in there before the move. I am suffering withdrawal already, I can't imagine what I will be like by the time we move!
I hope you like the new abode :)
Saturday, November 10, 2007
Oh So Lovely...
This week has scooted by so fast, it's just amazing. I spent a day and a half this week in Salt Lake City, Utah for work. The last time I was there was a year and an half ago for my very first Stampin' Up! Convention. How time flies.
I have been busy with work so the evenings and weekends have been consumed with getting in and cleaning out all the clutter in the house. Working out what to give away, sell or take with us to the new house isn't that easy! It sure is amazing how much one collects and doesn't use. Our motto is, take only what is worthy. Sounds simple...not so easy to execute! 34 days until we close on the house and I am starting to get into the packing mode. I have tackled the kitchen, spare room, the garage and the linen cupboards so far. The next great adventure is to work through my craft room....whah! :( lol
I walked in there this afternoon thinking, OK i can do this. Clear out the clutter that's all I have to do. Pack what I don't use often and hopefully leave the bare essentials out. Well, after looking around i realized that EVERYTHING is essential LOL. I put aside the thought of sifting through my craft room and decided to make a quick card...surprised???! :-D

I made this 4.5x4.5 card using Oh So Lovely Stamp Set, Chocolate Chip and Confetti cardstock, Le Jardin and Brocade Backgrounds Designer Series paper, Blue Bayou, Real Red and Close to Cocoa classic ink with a blender pen. I believe both ribbon have been retired from Stampin' Up! (smile) and I used a half pearl from the Pretties Kit.
OK now to head back into my craft room and try and begin sifting through the room. I can do this...really I can! ;-D
Friday, November 2, 2007
Name Day Card and Gift Tag
Do you know about Name Days? Well, if you aren't Greek or know someone who is Greek, probably not.
I took these photos at night so it has a haze of yellow to it...sigh :)
For members of the Greek Orthodox faith, name days are a much-anticipated event each year, greatly overshadowing birthdays.
Children born into Greek Orthodox families are given a name that coincides with the name of a Greek Orthodox officially recognized saint. The name day is celebrated on the saint's day (for example, Saint Patrick, Saint Valentine, Saint Nicholas), and is a cause for birthday-like celebrations including sweets, gifts, and parties. Much the same as birthdays in other cultures, the honoree is the host. Family and friends wish them Χρόνια Πολλά (pronounced HRON-yah poh-LAH, and loosely translated, means "many happy years").Here is the card and matching gift tag I made for a Name Day celebration last night. My Pretties kit is getting a lot of use these days! I used Stardust Stickles to dot the edges of the card and the scallop centerpieces.
The centerpiece is River Rock and Soft Sky cardstock, feathered with Close to Cocoa. I sponged the flower with Apricot Appeal classic ink and used a Rhinestone Brad for the flower center. I used the retired Organza Ribbon on this card, which works well - gives it just a little bit of detail without detracting from the centerpiece.I took these photos at night so it has a haze of yellow to it...sigh :)


Thursday, November 1, 2007
Mojo 9 Sketch Challenge
I was beep-bopping around blogs yesterday seeing all the wonderful creations of late. What fun to live vicariously when you can't get into your own craft room for some paper crafting therapy.
I used Julee's Monday Mojo Sketch challenge for the layout of this card. It's a Pretties Kit extravaganza! I have the kit have been using it sparingly of late but yesterday I dove right in and at one point had to just stop :D

This is Julee's sketch layout

Here is my take on Julee's sketch.
No stamps were used for this card. I used three separate sheets from the Stampin' Up! Le Jardin designer series paper, Chocolate Chip, River Rock and Soft Sky cardstock, the flowers, half pearls and tiny brad from the pretties kit as well as the blue brad from the Ice Rhinestone brad collection. The paper piercing set from the Crafters Tool Kit was used to pin hole the edges.
Monday, October 29, 2007
Gift Boxes
We arrived home from Boston on Friday and have spent the weekend decompressing and catching up with house chores. I managed to spend quite a bit of time in my craft room yesterday and put together these gift boxes, which I think are just adorable!
Papers are from K&C Co. Some supplies are Stampin' Up! - pearls, ribbons and brads. I was having a non-brand creative outlet yesterday, just using anything and everything I had. It feels so good to be home and to be able to paper craft again!
Happy Monday!


Papers are from K&C Co. Some supplies are Stampin' Up! - pearls, ribbons and brads. I was having a non-brand creative outlet yesterday, just using anything and everything I had. It feels so good to be home and to be able to paper craft again!
Happy Monday!


Monday, October 22, 2007
We have a winner!
Hi all,
Thanks to everyone who left feedback! What a great turn out...THANK YOU!
I used www.random.org to generate a random number and the winning number is 44!
I had to recount the entries as 13 was skipped, and there were a couple of double entries, so if my brain is working correctly, the lucky winner is Pat aka "foodpartyfun" ... now that's a name right up my alley! Congratulations Pat!!!
Pat, please email me at marie@stamplounge.com to cash in on your shopping spree!
Altered Card Holder
Greetings from Boston!
This is a tin I altered to store cards in. I used Basic Grey papers, scraps of ribbon I had in my little scraps drawer and a flower head from an artificial flower I bought at Michael's last summer :D. Acrylic Alpha Stamp set is from Stampendous.

PS - I will be announcing the blog candy winner later on today! :-)
Cheers and Happy Monday!
Wednesday, October 17, 2007
Appreciation Candy
I just noticed the ticker and saw that I have hit over 10,000 views and quickly approaching 11,000! WOW! Thank you to everyone who has been stopping by to view my roller coaster journey in paper crafting, reading my ramblings and leaving feedback - you guys rock! :D
So here is the deal, leave feedback and please leave a number in order of your comments and on Monday October 22 I will randomly draw a winner. The winner will get a free Stampin' Up! shopping spree for $20.00!! So go ahead and leave your feedback with your number and good luck!!!!!!!!!!!!!!
So here is the deal, leave feedback and please leave a number in order of your comments and on Monday October 22 I will randomly draw a winner. The winner will get a free Stampin' Up! shopping spree for $20.00!! So go ahead and leave your feedback with your number and good luck!!!!!!!!!!!!!!
Love wall hanging

 In the search for my crafting mojo, I made this wall hanging yesterday.
This is a power packed little item even though it appears simple.
It features the following items:
Brocade Background Double Sided designer series paper
Onboard Ginormous Pieces (backdrop and center piece)
Onboard Lots of Letters
Pretties Kit - Flowers, brad and pearls
Crop-A-Dile
Jumbo Eyelets
Ribbon
Dazzling Diamonds Glitter
Beaded Fringe (non Stampin' Up!)
Ruby Red, Mellow Moss and So Saffron Classic Ink Pads (for flower dyeing)
Here is a side view to give you a feel for the layering.

Here is a closer look giving you true color view of the Onboard letters and Flowers. It will make a nice little add to my wall art :)

Happy Wednesday everyone!
Monday, October 15, 2007
Curveballs...
Life has a way of throwing curve balls at you every now and then. I cannot believe it has been nearly 4 weeks since my last post!
Needless to say, my life has been on the fast paced track these last few weeks and all one can do sometimes is just hold on for the ride of life.
Work has been keeping me extremely busy as usual. I have done quite a bit of traveling and leaving again this week for a 9 day stint in Boston, without my craft supplies *sniff*
We have had rowing Regatta's nearly every weekend for the past 3 weeks which means weekend road trips with 4AM starts and late returns. They have singlehandedly wipe us out.
My older brother was here visiting from Australia also. He stopped in on his way through to a conference in Houston, Texas. I hadn't seen him for about 4 years, so it was great catch up time.
The best news of all is we bought a house!!!!!!!!!!!!!! A brand new spanking house which will be ready around December 14 without any unforeseen construction delays. We will hopefully be moving and painting over the Christmas/New Years break...what a nice Christmas present!! *smiling broadly*
So as you can see, it has been a whirlwind last 3 and a half weeks and has not left any time for crafting....none what's so ever! I know...shameful!!
I did mange to get into the craft room on Saturday. The weirdest thing happen. I walked in and out about three times before I could wrap my head around crafting again. I have definitely lost my mojo because nothing I made, had me doing that little "i love this" jig.
I decided to start on simple Christmas Card designs for this years cards and I made three before putting that thought aside for another time.
Here is what I made....I know! Not terrible but not great either! I need to find my mojo again...where oh where has it gone?! teehee

Attempt number 1: Arrrgh
Mental note: Don't use so much Crystal Effects next time! (or don't use it at all lol)

Attempt number 2: Errrrrr...
This one is cute except for the fact I didn't cut the paper correctly to have the dots centered...d'oh! Why is that all the things you know and usually pay attention too fly out the window sometimes? lol

Attempt number 3: OK, not so bad .....
This card i used the two way glue stick for the glitter and it turned out much better!
Well, after that disaster was cleaned up, I decided to play with my little tractor stamp I had bought and not played with. I used an blender pen to apply the real Red, Soft Sky and Close to Cocoa ink on this image and simply layered the image on real red and Designer Series paper. I kind of like this one....getting there...but not quite :D

Attempt number 4: Hmmm.....
Will definitely head back into the craft room soon!
Thursday, September 20, 2007
3x3 Thank You
 This is a 3x3 card we made as one of the Make and Takes at our Saturday upline meeting.
This little card packs a punch with all that is going on with it.
It includes; Apple Cider designer series paper for the background, scallop center and chipboard photo corner. Chocolate Chip 5/8 ribbon, Brads - antique Brass and Silver, Twill thread, Scallop and 1 3/8 punches, 2 stamp sets - Wanted and Artfully Asian. All together it makes for a very attractive Thank You card.
Tuesday, September 18, 2007
Christmas Joy Garland
I had seen this at Convention this year and have been wanting to try this and the Thankful garland (next project) for Thanksgiving. I finally had some time yesterday to try it. It was relatively easy and fun to pull it together. I love glitter so I had a ball glitterizing (that's a Marie word lol) one of the snow flakes and the "O".
 I used the Dashing Double Sided Designer Series Paper (main catalog) and the On Board Garland Greetings from the Holiday Mini catalog, Real Red Classic Ink and cardstock, Old Olive Classic Ink, Dazzling Diamonds glitter, Crystal Effects and the Red Ribbon from the Jersey collection.
Using a sponge dauber, I "dabbed" Soft Sky on the "J" snowflake. One it dried I applied a thin layer of Crystal Effects and covered it with Dazzling Diamonds. I did the same thing for the "O" except I used Real Red. I sponge daubed the Holly pieces and the "Y" snowflake with Real Red and Old Olive classic ink. I adhered a red button to the "Y" snowflake and placed these aside to let them dry while I worked on the rest of the project.
I cut three pieces of Dashing paper down to size and adhered them onto the front of each chipboard "plate" with a glue stick. I then flipped the J and Y over and cut out the paper using my hobby blade.
Using my Crop-A-Dile, I punched holes in the top corners of each plate and thread through the Red Jersey ribbon.
Once the chipboard pieces had dried, I adhered them to the Garland using Crystal Effects.
Monday, September 17, 2007
Beate's Sketch Challenge #19
Beate provided a really fun sketch this weekend for her weekly sketch challenge.

Here is Beate's sketch layout.
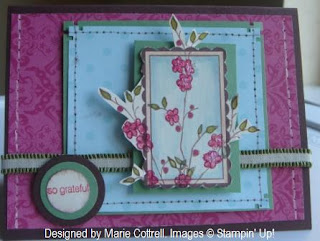 Here is my take on the layout.
I used Label Classics, Artfully Asian and cute converse stamp sets, Very Vanilla, Chocolate Chip, Old Olive cardstock, Rose Red and Soft Sky Double Sided, Designer Series Paper. Rose Red, Always Artichoke and Close to Cocoa Markers, Soft Sky, Creamy Caramel, Basic Brown and Chocolate Chip Classic Inks, Blender Pens, Close to Cocoa Marker, Sponge Dauber, Crystal Effects, Dazzling Glitter, Paper Piercing tool kit.
For the main image, I stamped the rectangular frame from Label Classics in Chocolate Chip and then stamped the Flower from Artfully Asian three times using Basic Brown in and outside the frame. I took my paper snips and carefully cut out the image.
On a plastic plate, I scribbled ink from my Real Red Marker and added a dollop of Crystal Effects and worked very quickly to color the flowers and then sprinkle Dazzling Diamonds over them. I then used my Real Read Marker to outline the flowers and color in the buds also.
I used Always Artichoke to outline the leaves and then used my blender pen and Old Olive Classic Ink to color the leaves.
With Soft Sky Classic Ink and my blender pen, I filled the background of the frame. I then switched colors to Creamy Caramel and used the Blender pen to fill in the frame mat.
I really like the look of this image and will be playing with this style and technique a little more in the next few days.
Happy Monday!
Sunday, September 16, 2007
Stampin' fun....
Yesterday was our quarterly upline meeting. Patty Bennett, who hosts our upline meetings had prepared some cute make and takes for us. One of our M&T's was decorating the new holiday Gift Certificates. This is so cute and yet takes no time to put it together, which is exactly what you want for the holidays!


How quick is it? Well, here we go....

Stamp your wreath using the Glorious Garlands stamp set. We used Wild Wasabi classic Ink.

Using a 3/4 round punch, punch out the center. Try and get it a little more centered than I did :-D (see next sample lol)
 Punch out the wreath using the new scallop punch

Press your wreath into a Versamark pad

Cover with Iridescent Ice Embossing Powder and heat set.
Tip: Do not over heat your Embossing Powder or it will dull it. Be sure to end heating when the EP has just finished melting.
Using the button hole punch, punch out holes for the ribbon as shown in the picture.

Thread and tie your choice of ribbon through the holes.

Insert your gift certificate and fold your card.

Finish it off by adhering the wreath with Dimensional's and by wrapping and tying 5/8" red ribbon around the folded card.
Tada! No more than 10 minutes (it would only take me 5 minutes to make these but tying the ribbons takes me an additional 5 minutes lol) and you have a super cute gift card all wrapped and ready to go!


How quick is it? Well, here we go....

Stamp your wreath using the Glorious Garlands stamp set. We used Wild Wasabi classic Ink.

Using a 3/4 round punch, punch out the center. Try and get it a little more centered than I did :-D (see next sample lol)
 Punch out the wreath using the new scallop punch
Press your wreath into a Versamark pad

Cover with Iridescent Ice Embossing Powder and heat set.
Tip: Do not over heat your Embossing Powder or it will dull it. Be sure to end heating when the EP has just finished melting.
Using the button hole punch, punch out holes for the ribbon as shown in the picture.

Thread and tie your choice of ribbon through the holes.

Insert your gift certificate and fold your card.

Finish it off by adhering the wreath with Dimensional's and by wrapping and tying 5/8" red ribbon around the folded card.
Tada! No more than 10 minutes (it would only take me 5 minutes to make these but tying the ribbons takes me an additional 5 minutes lol) and you have a super cute gift card all wrapped and ready to go!
Subscribe to:
Posts (Atom)

