Tuesday, July 10, 2007

A Muse A Palooza is here!

Yesterday was the first day of the A Muse A Palooza...how exciting! I went to an unveiling party last night, made a Milk Tin, received a bag of goodies, bought some stamps, lingered around the chocolate fountain dipping my marshmellows, strawberries and bananas and had a fabulous time. Of course, I Spent a little too much money, but its all worth it right? :-)

Below are photos of the milk tin and my stamp purchases....oh what fun there is to be had :D


Decrorated Milk Tin


A Muse give away goodies


A Muse stamps

Memory Box stamps


Stampendous stamps


Paper Inspiration stamp

Monday, July 9, 2007

Old London Town


Fond memories of good old London town. It was as expected - cold, dreary, yet full of history and life. The traditional English food I must say was terrible (no surprise there) but the ethnic foods were to die for :)

Snapshots of Frankfurt


I loved the old town feel of Homburg. We were there around Halloween so we caught the Halloween Festival in the town center which was fun. The weather was a little gloomy but didn't stop us exploring :-)
Posted by Picasa

Memories of Beijing

Here is a collage of snapshots of my trip to Beijing last year. I loved this city and definitely dream of going back again.


Posted by Picasa

I've been tagged...

I received a nice surprise this morning from Beth over at A Stamping Good Time. She blogged tagged me! My very first ever blog tag...Thanks Beth!

I neeed to state 7 facts about myself and tag 7 bloggers...so here goes :D

1) I am an ex-pat Aussie living in California
2) I love to White Water raft and kayak
3) I love to cook
4) My all time favorite dessert is Oreo Cookie and White Chocolate Bread Pudding
5) I am most creative in the evenings
6) I love my day job as an Event Marketing Manager for a high tech company in Silicon Valley
7)I love to travel

I am tagging;
Heather at {Witty Title Here}
Kristy at The Stamp Garage
Patty at Patty's Stamping Spot
Sandi at The Paper Gypsie
Jo at Here I Go Again

Sunday, July 8, 2007

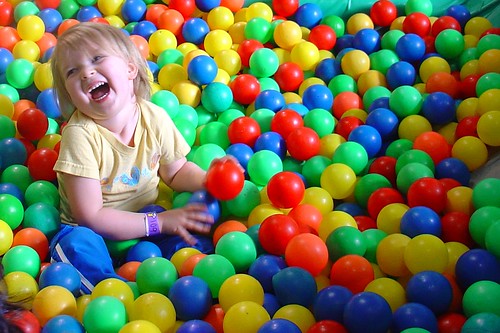
My all time favorite photo


Jess, originally uploaded by aussie_smile.

While going through my photo's, I found this photo I took of Jessi, the daughter of my close friends. This photo was taken in September of 2005. I love this photo because she is without a doubt, having a fabulous time. The laughter is contagious :)

Saturday, July 7, 2007

Sketch This Card Contest


This is my card for the Sketch This Card contest. I love this layout. I think I will be creating more with this one...thanks girls!
For this card I used: K&Company designer paper, Stampin' Up! Chocolate Chip cardstock and ribbon, and the retired Stampin' Up! In Full Bloom Stamp set. Cameo Coral, Real Red, Old Olive and Certainly Celery markers.

Thursday, July 5, 2007

Cassata Ice Cream


This my friends, is the world's best home made ice cream, without question, hands down, no doubt about it....lol...you get my point :D

I mentioned the other day, I was making the Cassata Ice Cream for our 4th of July celebrations but was unable to take a good photo of it yesterday so I had to crack open the small batch in the freezer I happened to save and take a photo of it and well, have another "small" taste also (laughing). It was as good as it tasted yesterday also :)

2 and half days of separate batch making, right there in my belly :-D YUM!

SCS Sketch Challenge

I used this weeks SCS Sketch to create these cards. These are 4.25 x 4.25 cards. I used the Soft Sky Designer Paper as well as the 6x6 Palette O Prints for both these cards.

This card used the In Full Bloom retired set, May's Art, ribbon, Stampin' Up! Real Red and Pumpkin Pie Markers.

This card uses The Wild About You stamp set as well as the On Board Blossoms accents, Real Red Craft ink, White Gel Pen, and Stampin' Up! Black Gingham ribbon.

Snapshots of a great day...

I hope everyone enjoyed their festivities yesterday. We had a great time, with great friends and fabulous food.

I came to the realization yesterday I am foodie photographer. No matter where I am, I always take photos of the food, whether its before, during or after the meal. Strange? I suppose, but for me, it captures the added fun and ambiance of the event. Here are some of my favorite shots :)


Tuesday, July 3, 2007

Happy 4th July!


I used this weeks Sketch This challenge to create my 4th July cards. I must say, it was a very timely design! :-)

For this card I used;

Stampin' Up! Not Quite Navy cut to 4 1/4 x 4 1/4, Stampin Up! Whisper White cute to 3 15/16 x 3 15/16 and My Minds Eye, Signature Life "Everyday Be" designer paper cut to 3 3/4 x 3 3/4.

I covered my Stampin' Up! On Board Accents Stars with scraps of my Fancy Pants Red and White paper and tied organza ribbon on the star. Stampin' Up! Real red marker was used for the dotted outline around the star.

I hope everyone has a fabulously fun and safe 4th July. Enjoy the time with your friends and/or family and remember, these moments last a lifetime :)

Happy 4th July everyone!

Decadent Trifle

Mission Trifle has been successfully completed... Yay!!! When making it from scratch it really does become a labor of love. It took 5 and a half hours of loving creation from start to finish, allowing for a quick lunch break only! lol

There are so many steps to this but boy oh boy, is it worth it...it is THE most heavenly summer dessert.

How many layers are there you may ask??? :-D Well, here they are;
Genoise Cake (French Sponge cake - cut into 3 layers - baked fresh today)
Fresh Fruit Puree laced with Charmbord liquor (heavenly!!)
Sliced fresh fruit (I used Figs, Strawberries, Raspberries, Peaches, Bananas, and Blueberries)
French Pastry Cream (made from scratch with real vanilla bean)
Whipped Cream

All in all, there are 3 layers of cake and 2 layers of fruit (not including the top), 3 layers of Chambord Fruit Puree. I can't wait to dig into it tomorrow! It keeps in the fridge very nicely and the longer it chills the better it is, so by tomorrow...mmm mmm mmm mmmmmm :-)


Making a mess in the kitchen

Today I am systematically turning my kitchen into a serious disaster zone while I make desserts for tomorrow's July 4th festivities :-D

I am making Cassata Ice Cream which is consists of three layers which of course means three different freezing times and ice cream making processes...whew! :-) The top layer is Almond, the middle layer is Chocolate and the bottom later is Vanilla with roasted flaked almonds and dried fruits.

Because it takes so long to make, I only make it every couple of years during the summer. I will be sure to take photo's of it tomorrow when it has been removed from the tin before its served up.

The other thing I will be making is a Trifle. Oh boy...can't wait to start on that! This is also a labor of love as I make everything from scratch. Yum yum :-D

I doubt any crafting will happen today but I am holding out hope that I will be able to sneak into my craft room later this evening as I have a project building in my head and I have to make more July 4th cards.

Happy Tuesday, im heading back down to clean up the mess from layer number two and get ready for layer number 3 :-D

Monday, July 2, 2007

Chipboard & Lacing


A while ago, I saw a lacing kit in my local scrapbooking store that I really like but at $50.00 there wasn't any chance in this lifetime I was going to buy it and well, I could just make it myself, right? Right!

I spent this afternoon in the craft room starting a couple of projects, finishing a couple, dreaming up a couple...a week long vacation is a lovely thing!

Here is my version of the lacing kit that I made using photos of my dear friends Mel and Steve's new born baby daughter and their two oldest kids, who I must say are the darn cutest kids I know :-D

I liked this project but have a few tweaks I want to make to it before I make the next one (one would be lace the pages together first!)

Supplies used are, Stampin' Up!:
2 12x12 extra thin chipboard (usually found in the back of 12x12 packages cardstock packs or Stampin' Up! Simply Scrappin' Kits) cut down to 6x3 3/4 pieces
Au Chocolate Paper
Soft Sky Designer Paper
6x6 Palette O Prints
On Board Blossoms & Basics chipboard (I LOVE THESE!)
In Board Simon lower chipboard letters
Green Gingham Ribbon
Craft Ink (do not use classic ink - the color sinks into the chipboard and changes color).

Sunday, July 1, 2007

Fun in the sun

We had purchased our friend a kayaking lesson for her birthday and today was the day for our adventure and what a glorious day it was! It was so warm and sunny...yay! We had so much fun on the water today and we looking forwarding to learning more skills...like safety and survival skills...that might be important :-D

I am the one in the center in both photos. The top shot was during our drill runs and the last one was when we had come into shore to end our lesson.

Stamping Heaven

We had our quarterly Stampin' Up! meeting on Saturday. As usual, I participated in the card swap. The rules of the swap was to create a 5 minute card.

This card was created with the Wild About You, Dotted Background and Hugs and Wishes stamp sets, Whisper White, Black and Soft Sky cardstock.

The penguin was punched out with the 1 1/4 round punched and layered on a black 1 3/8 round punch. Super easy and super fast to put together but yet, so super cute.

I love the make and takes that we make at these meetings. Here are a couple of my favorites:

This card uses the new Rhinestone Brads Stampin' Up! is offering in the Fall/Winter Catalog. The Rhinestones come in three sizes. This card uses the large and the small sizes. Totally adorable!
This 6x6 photo frame, which is yet to be finished with a photo, used the new designer papers and was super fast to put together. A great idea for those last minute gifts.

Thursday, June 28, 2007

Scalloped Borders

I made this card for a Sketch This challenge. The scalloped edge is quick and easy to make if you have a slit punch. How you ask? Well, I just happened to photograph the process, so here it is... (smiling)


I started off with my slit punch and the piece of scrap paper I wanted to use for the scalloped border.


Make sure to push the punch all the way flush with the papers edge to ensure you punch a straight edge. Line the punch corner on the very edge of the paper and punch.


Make sure to line the left corner of the punch to the right corner of the already punched scalloped edge (I hope that makes sense!), and punch along your card stock until you are done.


I like to twirl the top loose piece of paper around my fingers while I am punching as it allows me to gauge the punch more accurately.


Ta-da! And here you have it...a scalloped edge.
Trim it to size and off you go.

Wednesday, June 27, 2007

A hilarious package arrived...

I broke out in fits of laughter when I opened a package that arrived yesterday from Lindsay Moser. And how timely, while I am not-so-patiently awaiting my new catalogs from Stampin' Up!.

Lindsay, thanks so much for the package and the laugh it gave me. I will definitely keep the survival kit close at hand when the UPS truck finally rolls up to my doorstep!
I hope you all get a laugh out of this also.


Tuesday, June 26, 2007

Punches of fun

I came across these punch templates and had to share them. This would constitute many hours being spent in the craft room :)

Note to self: Finish your swaps first!