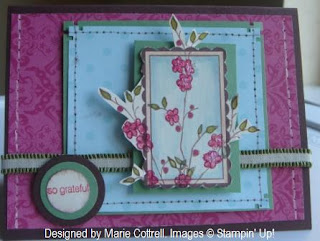
This is a 3x3 card we made as one of the Make and Takes at our Saturday upline meeting.
This little card packs a punch with all that is going on with it.
It includes; Apple Cider designer series paper for the background, scallop center and chipboard photo corner. Chocolate Chip 5/8 ribbon, Brads - antique Brass and Silver, Twill thread, Scallop and 1 3/8 punches, 2 stamp sets - Wanted and Artfully Asian. All together it makes for a very attractive Thank You card.
Thursday, September 20, 2007
Tuesday, September 18, 2007
Christmas Joy Garland
I had seen this at Convention this year and have been wanting to try this and the Thankful garland (next project) for Thanksgiving. I finally had some time yesterday to try it. It was relatively easy and fun to pull it together. I love glitter so I had a ball glitterizing (that's a Marie word lol) one of the snow flakes and the "O".
I used the Dashing Double Sided Designer Series Paper (main catalog) and the On Board Garland Greetings from the Holiday Mini catalog, Real Red Classic Ink and cardstock, Old Olive Classic Ink, Dazzling Diamonds glitter, Crystal Effects and the Red Ribbon from the Jersey collection.
Using a sponge dauber, I "dabbed" Soft Sky on the "J" snowflake. One it dried I applied a thin layer of Crystal Effects and covered it with Dazzling Diamonds. I did the same thing for the "O" except I used Real Red. I sponge daubed the Holly pieces and the "Y" snowflake with Real Red and Old Olive classic ink. I adhered a red button to the "Y" snowflake and placed these aside to let them dry while I worked on the rest of the project.
I cut three pieces of Dashing paper down to size and adhered them onto the front of each chipboard "plate" with a glue stick. I then flipped the J and Y over and cut out the paper using my hobby blade.
Using my Crop-A-Dile, I punched holes in the top corners of each plate and thread through the Red Jersey ribbon.
Once the chipboard pieces had dried, I adhered them to the Garland using Crystal Effects.
Monday, September 17, 2007
Beate's Sketch Challenge #19
Beate provided a really fun sketch this weekend for her weekly sketch challenge.
Here is Beate's sketch layout.
Here is my take on the layout.
I used Label Classics, Artfully Asian and cute converse stamp sets, Very Vanilla, Chocolate Chip, Old Olive cardstock, Rose Red and Soft Sky Double Sided, Designer Series Paper. Rose Red, Always Artichoke and Close to Cocoa Markers, Soft Sky, Creamy Caramel, Basic Brown and Chocolate Chip Classic Inks, Blender Pens, Close to Cocoa Marker, Sponge Dauber, Crystal Effects, Dazzling Glitter, Paper Piercing tool kit.
For the main image, I stamped the rectangular frame from Label Classics in Chocolate Chip and then stamped the Flower from Artfully Asian three times using Basic Brown in and outside the frame. I took my paper snips and carefully cut out the image.
On a plastic plate, I scribbled ink from my Real Red Marker and added a dollop of Crystal Effects and worked very quickly to color the flowers and then sprinkle Dazzling Diamonds over them. I then used my Real Read Marker to outline the flowers and color in the buds also.
I used Always Artichoke to outline the leaves and then used my blender pen and Old Olive Classic Ink to color the leaves.
With Soft Sky Classic Ink and my blender pen, I filled the background of the frame. I then switched colors to Creamy Caramel and used the Blender pen to fill in the frame mat.
I really like the look of this image and will be playing with this style and technique a little more in the next few days.
Happy Monday!
Sunday, September 16, 2007
Stampin' fun....
Yesterday was our quarterly upline meeting. Patty Bennett, who hosts our upline meetings had prepared some cute make and takes for us. One of our M&T's was decorating the new holiday Gift Certificates. This is so cute and yet takes no time to put it together, which is exactly what you want for the holidays!
How quick is it? Well, here we go....
Stamp your wreath using the Glorious Garlands stamp set. We used Wild Wasabi classic Ink.
Using a 3/4 round punch, punch out the center. Try and get it a little more centered than I did :-D (see next sample lol)
Punch out the wreath using the new scallop punch
Press your wreath into a Versamark pad
Cover with Iridescent Ice Embossing Powder and heat set.
Tip: Do not over heat your Embossing Powder or it will dull it. Be sure to end heating when the EP has just finished melting.
Using the button hole punch, punch out holes for the ribbon as shown in the picture.
Thread and tie your choice of ribbon through the holes.
Insert your gift certificate and fold your card.
Finish it off by adhering the wreath with Dimensional's and by wrapping and tying 5/8" red ribbon around the folded card.
Tada! No more than 10 minutes (it would only take me 5 minutes to make these but tying the ribbons takes me an additional 5 minutes lol) and you have a super cute gift card all wrapped and ready to go!
How quick is it? Well, here we go....
Stamp your wreath using the Glorious Garlands stamp set. We used Wild Wasabi classic Ink.
Using a 3/4 round punch, punch out the center. Try and get it a little more centered than I did :-D (see next sample lol)
Punch out the wreath using the new scallop punch
Press your wreath into a Versamark pad
Cover with Iridescent Ice Embossing Powder and heat set.
Tip: Do not over heat your Embossing Powder or it will dull it. Be sure to end heating when the EP has just finished melting.
Using the button hole punch, punch out holes for the ribbon as shown in the picture.
Thread and tie your choice of ribbon through the holes.
Insert your gift certificate and fold your card.
Finish it off by adhering the wreath with Dimensional's and by wrapping and tying 5/8" red ribbon around the folded card.
Tada! No more than 10 minutes (it would only take me 5 minutes to make these but tying the ribbons takes me an additional 5 minutes lol) and you have a super cute gift card all wrapped and ready to go!
Thursday, September 13, 2007
Mojo Monday Sketch #2
I woke early this morning and couldn't get back to sleep so at 5:45AM I decided to go tidy up my craft room before I started in on breakfast and then work. Well, I did put away 2 stamp sets and cleared a spot on the table and then I realized that was enough as I was too tired to clean up so I checked email and surfed a little instead. I checked Julee Tilman's Poetic Artistry site this morning to see what was going on in her world and lordy lord, a sketch challenge was posted on Monday! Oh boy...could I resist? No!
Julee has started posting Sketch Challenges to her blog every Monday called, Mojo Monday Sketches. Well, in my case, this is the No Mojo Monday Sketch attempt...lol
This is Julee's Sketch Challenge
This is my no mojo attempt at the sketch challenge using last years retired designer series paper (same style as the Wintergreen this year but different colors) and Chocolate Chip cardstock
I also used the Punch Pals stamp set, Scallop Punches from Stampin' Up! and Marvy, Coluzzle, 1 3/8 round punch, Wild Wasabi and Ruby Red Ink as well as a blender pen for the watercoloring technique with the ink pads.
Wednesday, September 12, 2007
Halloween stamp class
My next class is taking place on September 24 and it's all about Halloween! We will be making 3 halloween cards and of course a Garland.
For those who are too far away to attend, I offer long distance packets for the same price as the class. So if you are unable to attend my class but want to make these fun cards and garland, please email me at marie@stamplounge.com to inquire about my long distance packets.
Clipboard obsession....
I just love the Onboard Clipboards that Stampin' Up! offers. They are so versatile and make great gifts.
These go together easily and are so much fun creating. The hardest part is wrapping the clip. To do this I took a piece of scrap paper and roughly measured the clip. I then cut it out and kept adjusting the size until it fit snuggly around the clip. I then used that as my template for cutting the dsdsp.
For this project I used the Onboard 4 1/2 x 9" clipboard, wanted stamp set, Outlaw Double Sided Designer Series paper, Chocolate Chip 5/8" ribbon, Crop-A-Dile and Jumbo eyelets, Groovy Guava Classic Ink, Glue stick, and a corner rounder.
These go together easily and are so much fun creating. The hardest part is wrapping the clip. To do this I took a piece of scrap paper and roughly measured the clip. I then cut it out and kept adjusting the size until it fit snuggly around the clip. I then used that as my template for cutting the dsdsp.
For this project I used the Onboard 4 1/2 x 9" clipboard, wanted stamp set, Outlaw Double Sided Designer Series paper, Chocolate Chip 5/8" ribbon, Crop-A-Dile and Jumbo eyelets, Groovy Guava Classic Ink, Glue stick, and a corner rounder.
Monday, September 10, 2007
Beate's Sketch Challenge #18
I find myself really look forward to Beate's challenges every weekend.
Beate's layout this week is:
and my take on her layout is;
I used Chocolate Chip and Very Vanilla cardstock as well as the Le Jardin Double Sided Designer Series paper.Soft Sky and Close to Cocoa classic ink was used to stamp the scallop inner from the Wanted stamp set. A little strip of Chocolate Taffeta Ribbon, a few border dots using the paper piercing templates and a Close to Cocoa Marker and a little "So Grateful" stamp from the Cute Converse stamp set and wallah! :-)
Sunday, September 9, 2007
Can me some love...
What a weekend it has been...
We had earmarked this weekend with our friends Nancy and Holly that we were going to can tomatoes all weekend. Sounded like a great plan because it was except I had failed to inform my body I was going to put it through its paces. It is 11PM on Sunday night and the feet and back are screaming blue murder, the neck and traps are so tight I doubt I can lift my arm over my head but I can't help but smile broadly when I look at the 15x1 quart jars of whole tomatoes, the 33x 1 pint jars and 5x1 quart jars of tomato sauce sitting on the kitchen counter waiting to be placed in the cupboard for their winter debut.
We ordered our tomatoes from Smith Family Farm in Brentwood. It was our first time there and I was pleasantly surprised to come across such a quaint family run fruit and vegetable stand. Here is a collage of photos of the farm stand.
We had each picked up around 40lbs of Red tomatoes and 45/50 pounds of mixed Heirloom tomatoes. We used the Red Tomatoes for the wholes because they were fresh and firm and the Heirloom tomatoes were used for saucing. Here are some photos capturing our 2 days process.
Now onto the next project! :-D
Deck the halls...
Here are a couple of Christmas cards I made.
This used the Merry and Bright and Season of Joy stamp sets, Old Olive and Real Red cardstock and the Dashing Double Sided Designer Series paper. Inks used were Real Red, Old Olive and Soft Sky. A blender pen was used to color the tree image.
This quick card uses the Season of Joy stamp set, Old Olive and Real Red cardstock and the Dashing Double Sided Designer Series paper. Inks used were Real Red and Old Olive.
Saturday, September 8, 2007
Scrap Frame
I don't often dabble in scrapbooking but find that I am gravitating a little more to it these days, so you will be seeing some scrap layouts sprinkled amongst all the cards :)
This simple layout uses Stampin' Up's Le Jardin Double Sided Designer Series paper as well as their On Board Lots of Letters chipboards (love love!).
This close up of the chipboard letters shows how I layered them on blue DSDSP to create depth and contrast. I like the natural look of the chipboard against the soft yellow and blue so I decided to not alter the appearance of it.
Friday, September 7, 2007
I call this...Leafy port hole
This card reminds me of a cruise ship port hole window. I am not sure that is actually a good thing or not...hmmmmm *scratching head* ...maybe I just need a vacation...Hawaii anyone?
The Rock and Roll technique was used again to provide a little dimension to the leaf from the Touch of Nature stamp set for this 4.5x 4.5 quick card.
I used Pumpkin Pie and Close to Cocoa classic ink for the image and Close to Cocoa to feather the edge. Chocolate Chip cardstock was used as the base and layered with Apply Cider double sided designer series paper. A white gel pen was used to dot the Choc. Chip circle.
Thursday, September 6, 2007
Halloween Garland - Step by step instructions
I have had many requests to post the step by step instructions on making the Halloween Garlands posted a few weeks back.
These would be so cool for Thanksgiving or make large ones using 12x12 1 inch strips!
Have fun with it!
- Cut a 12x12 piece of double sided designer series paper down to 6x12
- Cut each 6x12 into 1 inch strips so you have 12x1inch strips
- Using your 1/8 hole punch of your crop-a-dile, punch through all 12 pieces of paper at one time, once at each end. Make sure to center the holes.
- Take a string of black gingham ribbon (i didn't measure it...probably about 8 inches) and tie a loop at one end.
- Feed the ribbon through the 12 strips of paper from top to bottom.
- Curve your paper to the size you want it by pushing the paper up the ribbon shaft to its desired size and tie a knot in the ribbon at that base of the ball.
- Tip: Be sure not to cut off any ribbon at this point if you want to add tags to the base of them.
- Fan the pieces of paper around until you get the look you want
- Stamp your Halloween images on white paper - make double the amount of garland balls that you made.
- Punch images out with 1-1/4" punch
- Punch out 1-3/8" circles of black cardstock
- Mount a stamped image on each side of the black punched out cardstock
- Tip: Be sure to glue them both facing up in the same direction
- Using the 1/8 punch on your crop-a-dile again, punch a hole at the top of each tag.
- Tie the tags at whichever length you like at the base of each lantern.
- Optional: Add some bead bling from your Pretties Kit
- Trim your ribbon
These would be so cool for Thanksgiving or make large ones using 12x12 1 inch strips!
Have fun with it!
Autumn Colors...
Can you believe Summer is over?
It's nearly time to pull out the apple cider and milling spices, light the fires and of course start planning our annual Pumpkin Carving Party...oh, let me find a photo of last years final masterpieces to share.....
Aren't these the cutest?!
OK, I digressed just a tad but it does put me in the fall spirit and of course that means fall colors also. Here are two cards that I made using fall colors.
For this 10 layer card, I used the Rock and Roll technique for the leaf. I really like the multi dimensions of this card.
Supplies: Touch of Nature and Baroque Motifs stamp sets, Chocolate Chip cardstock and Apple Cider double sided designer series paper.
For this card, I used the flourish from the Baroque Motifs stamp set to stamp on the Apple Cider double sided designer series paper with Close to Cocoa.
I then stamped with versamark the small flower from the Season of Joy stamp set on the Really Rust cardstock to create a background. "Thank you very much" from the Much Appreciated stamp set was stamped on an angle and I used ribbon from the Theater selection and Chocolate Chip 5/8" ribbon with 2 green buttons to finish off the card.
Wednesday, September 5, 2007
Beate's Sketch Challenge #17
I can't tell you how good it is to be back home and to get some time in the craft room. It has been 8 days since my last post (I feel like I'm at confession) and getting some card making therapy time has been a long time coming!.
To get back into the groove, I decided to use Beate's sketch challenge #17 as my mojo revver-upperer.
This is Beate's cool layout for last weekend.
My takes on her layout are:
Trick or Treat...
Booglie Eyes Stamp Set, Creepy Crawly Designer Series Paper, Black cardstock, Lavendar Lace, Green Galore and Pumpkin Pie Classic Ink, Blender Pen, Coluzzle
I liked the layout so much I made a second card, this time using a Christmas theme.
Season of Joy stamp set, Dashing Double sided Designer Series paper, Real Red and Old Olive cardstock, Old Olive classic ink, Close to Cocoa
marker, sponge,Key Tag punch.
Subscribe to:
Posts (Atom)