Wednesday, April 30, 2008

Lot's of Stitching

I am so totally falling in love with real stitching on cards. Here are two cards I made recently that have zero stamping and lots of stitching, the bottom one especially. I used die cuts from My Mind's Eye line of faboo designer papers and coordinating die cuts.

Not sure if you can see it but every die cut has been stitched on to the background paper and then the background paper has been stitched to the card stock.

It's time for me to change up the thread colors now that I am feeling UBER confident with the sewing machine now!

Nothing like a little fun and experimentation in the craft room! :-)

Tuesday, April 29, 2008

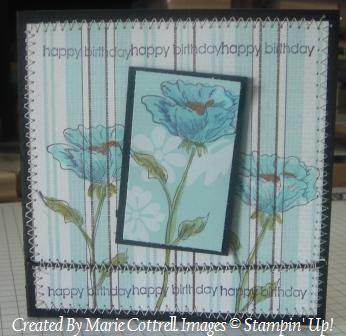
Happy Birthday

This is my twist on the Spotlight Technique. I just received my Bloomin' Beautiful stamp set and couldn't wait to play with it.

This card uses; Bloomin' Beautiful stamp set, Afternoon Tea Double Sided Designer Series paper, the sentiment from the Bitty Birthday's stamp set, Basic Black Cardstock, Black Cord, Cool Caribbean, Old Olive and Pumpkin Pie Classic Re-inkers, Aqua Painter and my sewing machine.


Happy Tuesday everyone!

Tuesday, April 22, 2008

Imagine Freedom

Here is a wall hanging that I have been working on for the past week. I was inspired by the Tim Holtz Grunge Board samples at the Rubber Stamp Convention in Sacramento last week.


For this wall hanging, I used a small plaque I picked up while antique browsing for $3. Imagine Tag stamp from Invoke Arts (invokearts.com), SU Soft Sky and Very Vanilla Cardstock, Grunge board, Tim Holtz distress inks, Black Staz On ink, SU close to cocoa and choc chip inks, SU Weathered Background Stamp, Flourish from the Baroque Motifs stamp set, a key charm I had picked up a while ago at a LSS, Copper round bling I had lying around.

Happy Tuesday everyone!

Monday, April 21, 2008

Sweet Little One

I made this card for our friend's new baby girl. Her nursery colors are black, pink and white, so this cards works in with the colors selected.

I used Basic Black cardstock, My Minds Eye Designer paper and die cut, Stampin' Up! Rub-ons from the Cherished Moment set and of course, zig zag stitching around the border.


Here is a close up of my stitching...I'm getting better at it and no, I haven't stitched a finger yet :-)

Judy's 6x6 Envelope Brag/Card Book

Yay for Judy taking pictures of the 6x6 brag book she made while visiting!

Here are the pics of her adorable creation. She used the Chocolate Chip 6x6 envelopes from the Scallop notes set, a Soft Sky Scallop note (halved), SU Le Jardin Double Sided Designer Series Paper, Soft Sky cardstock, Stampin' Up! Ribbon, Flowers from a local scrapbooking store and SU! Hodgepodge elements....so cute!

Thanks for the photos Judy!


Sunday, April 20, 2008

Beate's weekly sketch challenge

So I had some time today to play and one of the cards I made was for Beate's weekly sketch challenge. Surprisingly enough it's the same layout I used for my March Card Swap card, so I was a little excited to play again with the layout.

I used Chocolate Chip cardstock and My Mind's Eye Birthday Girl/Aqua Paper double sided designer paper from the Wild Asparagus Line as well as their die cuts to pull this card together. I love my new sewing machine (thanks again Judy!!) and used the straight and zig zag stitches on this card. The Cropadile was used to apply the brads...I just wish I could align them straight! lol


Priceless

4 drawers of unorganized ribbon
11 jars
188 clothes pegs
Colorful, easy to see ribbon storage....PRICELESS!!


I am often found in the predicament of looking for that perfect ribbon to finish off my card. I know I have it because I am a ribbon buying addict but I just can't find it and really, I would choose Chinese water torture to having to go through the multiple drawers and plastic containers of ribbon for 1 card but now I have all my ribbons are separated by color and SOOOO cutely displayed on my craft table. :-)

Friday, April 18, 2008

6x6 Envelope Brag Book

We had such a great time with Judy and Ron this week, it was definitely sad to say goodbye at the airport. Another great visit ended...sigh.

Judy and I did get a chance to craft for an afternoon and we each made a 6x6 envelope card/brag book made from the 6x6 envelopes supplied with the scalloped round notes from Stampin' Up!

I was a doofus and forgot to take a photo of Judy's creation before she left. If I can get Judy to take a picture of hers, I will post it :-D (hint hint Judy! lol)

For my version, I used Chocolate Chip envelopes, Soft Sky Cardstock and left over DSDSP from the Rose Cottage Scrapin' Kit. SU Organza Ribbon (Retired) and SU jeweled brads. The Prima flower comes in a set of 12 that I recently picked up from a local scrapbooking store, Versamark and the flourish stamp from the Stampin' Up! Baroque Motifs stamp set. The brown and blue ribbon I have had for a while. I picked up a couple of yards of it at Vintages in Los Gatos, CA. They have (or had...not sure, I haven't been there for a while) a great selection of unusual and vintage ribbons.


Monday, April 14, 2008

More birthday celebrations and flowering Peonies

It seems the birthday celebrations around here just don't end!

We went to Joe's Crab Shack in Old Sac Town with a group of friends to celebrate Judy and Sheri's birthdays on Saturday night. Joe's Crab Shack was a lot of fun. There were dancing wait staff - every 30 minutes music would play and all the wait staff would line dance to the music. Also, the birthday girls had to don wigs and hats and ride wooden ponies around the restaurant while we sang happy birthday to them. It was hilarious to watch. I am not too sure Judy and Sheri had as much fun though *LOL*


Last night we had a BBQ dinner at home of Maui spare ribs (absolutely delicious!), mashed potatoes and corn followed by a triple layer coconut cream cake- recipe courtesy of Martha Stewart.


I do believe this is the last of the birthday cakes for a while. This cake was labor of love. It took about 3 hours from start to finish as everything was made from scratch - the cake, the coconut cream filling and the 7 minute frosting.


While I was out tending to the BBQ, I noticed that my Peonies are flowering and they look spectacular.

Sunday, April 13, 2008

Sacramento's Original Rubber Stamp Convention

Judy and I headed over to the Rubber Stamp Convention in Sacramento yesterday. We strolled around the booths looking for cool new stuff (more on that below) and of course, inspiration.

Here are some pictures I took of some very cool marker colored or direct to rubber stamped cards, these are super cute and from the demo, seemed very easy to make.

Click on the pictures to get a better view.


Now, this is what I am VERY VERY, SUPER DUPER excited about! The new "Grungeboard" from Tim Holtz.

What is Grungeboard you ask?? Well....it is a compressed flexible sheet of "dingy" material with a debossed texture that can be painted, inked, sanded, hammered, die cut or "grunged". It comes in packs of plain paper,textured alphabets and shapes. THIS my friends, I am VERY excited about. The finished product looks and feels like leather.

Here are some samples:

In this card, the wings and crown are created from the Grungeboard


In this one, the bird, alphas and Man with wings and crown are created from the Grungeboard


The alphas and bird are Grungeboard creations


And on this tag, which the guy from the Tim Holtz booth demo'd for me on the spot, the bird is made from the grunge board.


So, whats cool about the Grungeboard?? Well...so glad you asked :)

For a self stamped image, for example like a flower, you stamp the image with archival or stays on ink, cut it out. Spritz it with water, manipulate the image with your fingers to create a three dimensional effect, blast it with your heat gun to set it, then you ink it with your favorite distressed inks and wallah, a super cool, 3D item for your card front, scrap book or multi media piece.

I bought the plain paper, the alphas and the shapes....so you can guess what you are going to be seeing a lot of in the near future :-D

I hope this has inspired you a little to at least go check out the product!

Friday, April 11, 2008

Judy's Birthday

Sheri's parents, Judy and Ron are landing tonight to spend a week with us - yippee!! We always have such a great time together and we are looking forward to showing them around our new area. Tomorrow night we are celebrating Sheri and Judy's Birthday's which fall a day apart and occurred this week on the 7th and 8th.

This is the card I made Judy for her birthday. I am assuming since she is in the air and we will be at a Rubber Stamp Fair tomorrow, so she wont have time to sneak onto the computer and accidentally see her card and gift! I won't have time to post them over the weekend, so here they are :-D (fingers crossed the surprise isn't ruined!)

For this card, I used the Embrace Life Stamp set for the main image and the Boho Backgrounds for the background and positioning of the red Sitckles. Ribbon is from Stampin' Up's line Flirty (brown) and Theater (Green). Very vanilla, Real Red and Soft Sky cardstock was used.


Here is the 3D view of the card showing the Red Stickles and Crystal Effects application. I love the way it pops out on the card giving it a really cool effect.


For Judy's gift, I took a wedding picture of her and Ron copied it, rubbed some Micro Glaze oer the top of it to prevent fading and ink leakage (I love Micro Glaze!) scrapped and framed it using Stampin' Up's DSDP paper, My Minds Eye Wild Asparagus Line of embellishments and SU's chipboards to create this page.


And here it is framed. I hope she likes it!

Modern simplistic and personally inspiring...

As I was cleaning up my craft room, I came across this card I had put to the side. At the time, I was deliberately trying to not use stamps or ink and just focus on the adhesives in one of Stampin' Up! Scrappin' Kits to make 4x4 cards. The funny thing is, I liked it just this way when I was making it and couldn't bring myself to "finish" it and still love the simplicity of this card now, so it's now official "finished" and in my completed stack.

I don't know about you but as a card maker, I go through many different styles and trends...some are highly embellished, some are monochromatic, some are distressed or antiqued and some are just plainly...well, plain :D


During my spring cleaning, I came across some artificial flowers I had laying around, looked at the colors, looked at the card above and had an "aha" moment....I said to myself, "self...this is your challenge for today...Make a 3D card with these flowers inspired by the card I just found" and well, here it is. Again, simple in design but it packs alot of visual effect because of the flowers. The tone on tone effect with the cardstock and ribbon I find delightful. Of course now the hunt is on to find an envelope I could use for it....but then again...maybe not :D


Wednesday, April 9, 2008

March Inner Circle Swap Club

Here are photos of the cards submitted by the members of my Monthly Inner Circle Card Swap

Regular Swap:


Monthly Challenge: Distressed Backgrounds


Tuesday, April 8, 2008

Sheri's Birthday

It was Sheri's Birthday yesterday. I made this card for her featuring the flower stamps from Stampin' Up's Time Well Spent stamp set.

I used classic inks and the blender pen to fill in the flowers using Certainly Celery, Pretty in Pink, Real Red, Tempting Turquoise and Soft Sky.

The paper is from My Mind's Eye, which most of you will know is my all time favorite paper source as their designs are super cute and versatile.

I used my spanking new mini Janome Sewing Machine (given to my from Judy for my birthday - thank you!!!) to stitch the paper together.


I also made Sheri her birthday cake. I used Judy's secret family Chocolate cake recipe and used fresh whipped cream between the cake layers and for the cake outer....yum!!


It was sooooo good, we had second!